Offshore V-Neck

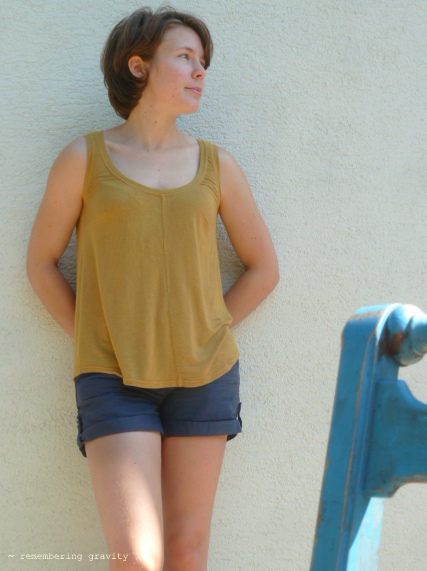
Here’s a jumper I knitted. The Offshore V-Neck by Bristol Ivy:

IMG_2760

I picked up a bag of lovely Debbie Bliss Donegal Tweed in a Brocki for pretty cheap, and started looking for a project. Since my last big knitting projects had been all about colourwork (Aftur and Bláithín), I wanted a bit of the other one: cables. I loved the Offshore jumper as soon as I saw it and dived straight in.

This was all nearly two years ago. The process was a bit of a slog due partly to my own indecision and mistakes, and partly to the confusingly-written pattern.
I started in the smallest size, and after I’d knitted the bottom ribbing and a fair chunk of the cable pattern I realised it was going to be too small, so I ripped it all back and started in the next size up. I hate the idea of knitting something and it being unwearable.
I also made a few mistakes in the increasing and decreasing along the way. In the past  would have left some of these in, thinking it added to the charm of a hand-made piece, but these days I’d rather put in a bit of extra time and do it properly (it’s one of the things about me that winds my boss up).

Here are some pictures of the jumper before the nitty-gritty:

So, the pattern problems. I’ve put these on my Ravelry as well, but for anyone who doesn’t have an account / can’t be bothered to click through / isn’t that interested in knitting pattern notes but will read them anyway if they’re there, here they are.

  • Other knitters have noted that the yoke, as written, is far too small and therefore the armholes and neckhole are very tight. As other knitters did, I added depth to the yoke by stopping a number of rows early, as if for two sizes above the one I was knitting, and spacing out the raglan decreases correspondingly.
  • Something that it would have been nice to mention in the pattern is that it is VERY IMPORTANT that the body and sleeves are both stopped on an odd-numbered row of the cable chart, bound off on an even-numbered row and then joined on an odd-numbered row. Otherwise you will find yourself trying to cable from the wrong side.
  • The “at the same time” section of the pattern is complicated, and even more so if you’re trying to re-write it to make the yoke deeper. I drew out a chart to help me keep track of the neckline decreases and raglan decreases as well as the stitch counts for front, back and sleeves. Here is my chart:
    IMG_2805
  • It’s also VERY IMPORTANT that when you get to the end of the neckline shaping you have 25 stitches left for each sleeve so that the saddle section works.
  • I added an extra 5 rows at the end of the neck cable chart to increase the size of the neck hole. I should have added an even number, because I ended up with my cable row on the wrong side for the saddle. This was manageable, but annoying, and a silly mistake to make.
  • There are 2 major actual mistakes that I can remember in the pattern:
    One is on the cable A chart, there should be a purl stitch at the end of the chart (before you go back to stockinette stitch).
    The other is in the right saddle decrease instructions. They should read:
    Row 1: Work 24, p2tog, turn.
    Row 2: sl1, work 23, ssk, turn.
    Row 3: sl1, work 23, p3tog, turn.
    Row 4: sl1, work 23, sssk, turn.
  • The pattern says to pick up 67 stitches around the neck. I’d increased the size of the neckline so I picked up 83: 18 for the back, 13 along the vertical of each saddle, 19 down each side of the front and 1 at the centre front. I picked the stitches up in the 2×2 rib instead of just straight.

I don’t want to put anyone off knitting this pattern. It’s really lovely and I’ve been wearing it almost daily ever since I finished it. It just needs a bit more thinking through than other patterns.

On my version, the beautiful cable pattern gets a bit lost in the tweedy wool, so I’d probably recommend knitting it in something a bit simpler, but I also don’t turn down cheap, good quality wool from a second-hand shop, so I can’t complain.

Unselfish Sewing – Wahid Waistcoat

P1220272

So, about that waistcoat then. I decided quite a while ago that The Boy deserved some of my sewing time and energy, but it’s much harder to find tempting sewing patterns for men than it is for women. I had my eye on the Ryuichiro Shimazak book “Les Chemises” for a while, but nowhere I looked has had it in stock over the six or so months that I’ve been looking. Then I stumbled across Make My Pattern, an unselfish sewing project if ever there was one. Joost de Cock, in an attempt to make sewing your own clothes easier for men has an expanding range of men’s clothing patterns on his website for free! Of course, in this case it’s not a man he’s giving a helping hand to, but I (and hopefully my boyfriend) are extremely grateful nonetheless.

I gave myself a deadline on this project (birthdays are only provisional deadlines after all): I wanted him to be able to wear the waistcoat to a wedding on the Friday exactly one week after his birthday. Well, he did wear it to the wedding. I sewed the buttons on in the car on the way to the church – there’s nothing like leaving it until the eleventh hour.

So – the pattern.

To get a pattern from Make My Pattern, you have to put in the measurements of the person that the garment is for and out comes a pattern specifically for those measurements. The list of measurements to fill in is very long, but there’s a helpful guide for exactly how to take each measurement, and the garment that resulted really was very fitted to The Boy.

P1220278
(Those darts look a bit more woman-shaped than man shaped… must work on my cutting and sewing accuracy!)

P1220279

Even when you’ve put in the measurements and hit download, the website gives you a whole host of further styling options such as length, where you want the V to fall, how many buttons you want, and fit. There are 5 different fit options ranging from Skinny to Loose. I went for the second slimmest fit (called, appropriately, Slim) and I’m glad I didn’t go skinnier – I really don’t think he’d have been able to do up the buttons if I’d gone for the skinniest. As it’s not part of a three-piece suit I didn’t intend it to be worn closed anyway, so the close buttoned-up fit isn’t a problem. But he wouldn’t get a three-course meal under those buttons!

The shell of the waistcoat is made of a slightly coarse linen-and-something mix that’s been sitting in my stash for a while, and I lined it with some fairly fluid viscose. I left it hanging for a week or so before finishing the lining and shell hem, to let the lining stretch out as much as it wanted. The lining is still bagging towards the bottom a little bit more than I would like, it’s not noticeable when it’s being worn, but you can see it in this picture:

P1220402

P1220396

P1220401

P1220398

P1220404

I had some trouble with the pocket construction. For a start they seem to be very low down on the waistcoat (although they don’t look so low-set on Joost’s example) and when I was sewing them together, the pocket lining and pocket bag didn’t match up length-wise at all. One part was some inches longer than the other. It was only the second time I’ve sewn welt pockets, so I might well have just completely misunderstood the instructions, and I just cut the longer part to match the shorter (and then cut both so that they weren’t hanging out of the waistcoat!) so it wasn’t a very major problem.

P1220295

P1220296

Well I’m not too traumatised by my first encounter with sewing men’s clothes, I’m still determined to make a nice shirt (there’s a pattern for one on MMP, I just have to brace myself for it, and sew a few things for myself first), and I’m looking forward to seeing Make My Pattern’s development.
Now for some simple sewing for myself. If I can bear to turn on the iron in my new top-floor flat, in this Swiss summer heat!

Save

Here are some things I sewed

IMG_4006

Since my sewing machine has already gone to await me in my new flat, and I am sewing machine-less for two weeks, my mental “oh I’d really like to sew a…” moments have increased (possibly in similar style to the way I now say “oh I wish I’d practised the piano more” to my mother now that I know she can’t enforce practice any more). And since the tailing off of my blogging hasn’t coincided with a tailing off of my sewing habit, I’ve built up a bit of a backlog which I will now try and rectify in one over-crowded blog post to assuage my sewing cravings.

So first up, something I made *ahem* before Christmas: a green Moss mini skirt from Grainline Studio. I had some fabric left over from making the curtains in the van we went to Italy in, it’s a green heavyish cotton something (fabric identification isn’t my strong suit) and I totally ripped off Poppykettle‘s military green with a red buttonhole (although her buttonhole is rather neater than mine).

(It’s hanging wonky because of how I’m standing, not the skirt. It’s boring hard trying to take half-decent photos showing your garment!)

P1210983

I like the construction of the pockets – the top layer of pocket has a bit of extra fabric in it to give you room to get your hands in (something which we were told off for at school. I remember a teacher threatening to sew up pockets that she found pupils’ hands in)! I bar-tacked the bottom of the pockets to be on the safe side, which you can just see above with red thread (to match the button hole.)

This was the first time I had done a) a fly zip, and b) flat-felled seams. I think they came off fairly well although I pressed (and flat-felled) the front seam in the wrong direction to work properly with the fly. Note to self: when flat-felling a front seam under a fly opening, sew seam first and press to the RIGHT hand side of the garment before pressing over the seam allowances to flat-fell. I managed to bodge it all together with a couple of bar tacks for security (in matching thread this time so no-one will notice). The flat-felled seams on the back yoke don’t match up perfectly which is something I’ll have to think harder about next time round.
Another thing that irritates me a bit (which could be down to my technique, although I’ve also noticed it on other bloggers’ Moss skirts) is that the waistband kicks up a bit on both sides where it meets at the centre front. I’ve cleverly managed to cover this up in the photo of the skirt on me above, but you can sort of see it on the one side in the flat shot below.

I lined the pockets and the waistband with some leftover red fabric to match the buttonhole and zip to make the skirt neat on the inside.

P1220005

Ok, still here?
Right. Next up is another pre-Christmas quickie which I made just before going home for the holiday. It’s the Back is Back top from Vanessa Pouzet, who doesn’t seem to be so well known in the non-French sewing blogosphere. But I have contacts in that realm who give me inside information. It’s also potentially intimidating to tackle a sewing pattern in French, but the internet is a wonderful place full of translation websites and the like, and it’s not a hugely complicated pattern.(French independent pattern companies are also a LOT cheaper than the English-language indie pattern companies. This is a slightly above-basic yoked sleeveless top, and the cost is 4 euros. #justsaying).

This particular pattern has a plunging v-back in two different depths. I think the deeper v looks really elegant in the pattern picture (much more classy evening-wear than the shallower more day-wear variation) but I wanted to be able to wear a bra under the top without it showing, so I cut the back v to stop just above the back of my bra. I used some black viscose crêpe for this, and for the yoke I used lace as similar to that on the website picture as I could find.
Due to my time constraint and my seriously depleted French (it used to be pretty good… until I started learning German) I didn’t read the instructions properly and botched the finish of the back. I think sewing the back seam after binding the neckline would have been more sensible, rather than automatically sewing the centre back seam as the very first step. Still, under low Christmas party lighting, who’s going to notice?


If you’re still here, well done. This turning out longer than I expected it to.

On the subject of French patterns, here’s another gem: it’s the Trop Top from Ivanne S. A seriously multi-variation pattern for much less money than other independent companies might charge. It has so many add-ons, collars, sleeves, cuffs, button back, peplums (pepla?) that the reams of French instructions are, again, a little intimidating for non-French speakers, but totally worth it if you’re willing to spend a little time on Google (other search engines are available).

I’ve only made two of the same version (jersey, with cuffs) so far, but I really like the  button-back, back v-neck version in broderie anglaise at the top of the website page.

Front of one top, back of another.

The last two things I want to put up are two things that I sewed in a panic when I realised I’d agreed to send my sewing machine on ahead of me two weeks in advance of me moving – I dunno, maybe in case something goes horribly wrong in the move and I can never use it again!

The first of the two are Ooh la leggings from Papercut, in some navy blue cotton jersey (I think it’s 100% so I’m not sure how well the recovery is going to hold up in the knee area. I like the seam lines down the front and back, they give the leggings a bit of je ne sais quoi over other leggings. I top-stitched all the seams, not just the ones that the pattern suggest top-stitching because, not having a serger, I want a bit more security than the zigzag stitching provides.

The one thing with these leggings is that the front comes up a lot higher than the back, I think next time I’ll try and cut the front piece a bit lower.


I also made a quick Tiny Pocket(less) Tank which I cut on the bias as an experiment to see how differently it hangs.

I think that’ll do for now.

Named Quinn Shirt

P1050336

I bought this pattern in the Named advent calendar sale. I’ve had it in my sights for a while because although I love the Archer shirt pattern, the interesting cross-over collar, button placket and French cuffs mean that this shirt is just a little more dressy. And sometimes I want something a little bit smarter. Continue reading “Named Quinn Shirt”

At Last: Bláithín

IMG_2926

I notice, as I leaf lazily (and metaphorically) through my blog, that I haven’t written anything about knitting since August. This came as quite a surprise, as I probably spent more time knitting last autumn than I did sewing. There was the purple cardi, which I sort of finished, and then decided needed the button band re-doing (it’s currently sitting on my sofa with the button band removed but not replaced), a couple of baby presents, but mostly this cardiBláithín by Kate Davies.

Two cardis, you think, that doesn’t sound like so much. Oh if only you knew, dear reader, the sorrows I faced. Perhaps I exaggerate. Not sorrows, then, let’s call it frustration. Continue reading “At Last: Bláithín”

Camas

P1210255

Well, just to break the Grainline trend for a bit (although only temporarily), here are a couple of blouses from Thread Theory, which brought out the Camas blouse (their first pattern for women) back in the spring. I bought it almost straight away as a PDF (and then sort of wished I’d waited, and got the hard copy) and made one up in this anonymous flowery jersey fabric which I bought online. It’s really pretty, but I have no idea what the fibre content is – it feels like viscose, and is extremely fluid and light. Unfortunately after several washes the colours are beginning to look a bit tired – I’m far too lazy to handwash! Continue reading “Camas”

Morris

DSC_0195

When this pattern came out, Grainline Studios was only half on my radar. Every time I saw a Grainline pattern I thought they looked so well-made that I thought they were way out of my league. But then I got a couple of their other patterns under my belt (including the Archer shirt, which I knew was much more complex, construction-wise) I stopped being scared of it. And then I came across some lovely ponte in a sale which just shouted “Morris” at me. I had a look at other patterns for more casual cardis, but the Morris pattern kept coming back into my head, and in the end I caved in and clicked ‘buy’ (and then asked my poor long-suffering mother to cart it across the Bernese Oberland to me.) Continue reading “Morris”

Archer

P1210273

Well, I finally took a leap and moved myself from fairly easy-construction garments to shirts. There are a lot of Archer shirts around the blogosphere, and I’m only going to keep adding to it, because I love the pattern. But I’m not going to write a lot about it, because frankly the sewing blog community is full of more experienced people who have a lot more intelligent things to say about shirt construction than I do. Continue reading “Archer”

A Heffalump Linden

P1210099

This is my current favourite item of clothing in my self-made (or, if you insist, me-made) wardrobe (or possibly my entire wardrobe). At least, it is as the moment, but my first chambray Archer shirt is coming up on the outside, and when I’ve hemmed it and put the buttons on, it could well be neck and neck. (Or collar and ribbing. Ha!) But anyway, I’ll let the jumper enjoy it while it still has the edge.
It’s the Linden pattern from Grainline Studio, made from some lovely cotton interlock printed (in case you hadn’t noticed) with elephants.  Continue reading “A Heffalump Linden”

The last throes of summer: more Tiny Pocket Tanks

P1210120

Every time I think that summer is fading into autumn, and the relief of cooler days, the sun pops back up and says “hey! How about a nice cup of 35 degrees?” and I have to pull out the summer clothes again. That said, unless we get an Indian summer, I expect that last weekend will have been the last bout of swelter for this year. So in honour of that, here is the last of my summer sewing, in the form of some more Tiny Pocket Tanks.  Continue reading “The last throes of summer: more Tiny Pocket Tanks”